
How to Update CentOS On Your VPS Server
How to Update CentOS on Your VPS Server
Introduction
Keeping your CentOS VPS server up-to-date is essential for maintaining the security, stability, and performance of your online presence. Regular updates patch vulnerabilities, enhance features, and ensure compatibility with new software. In this comprehensive guide, we’ll walk you through the process of updating CentOS on your VPS server step-by-step.
Step 1: Access Your VPS Server
Before you can start the update process, you need to log into your VPS server. This is typically done via SSH (Secure Shell).
Logging in via SSH: Use an SSH client like PuTTY (for Windows) or the terminal (for Linux and macOS). Connect using your server’s IP address and your login credentials.
Prerequisites for the Update: Ensure you have root or sudo access. It’s also a good practice to backup your server before making any changes.
Step 2: Update the Package Repository
Once the terminal is open, you can update the package repository by running the following command:
yum update
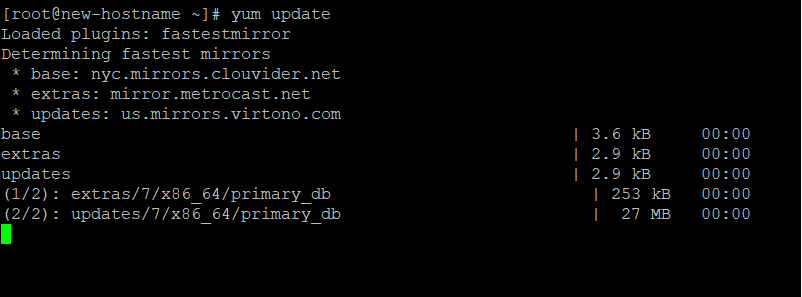
Understanding Package Repositories: Package repositories are collections of software packages and metadata that Yum uses to resolve dependencies and install updates.
Step 3: Review and Confirm Updates
After running the command, yum will check for available updates for all installed packages. It will then display a list of packages that can be updated. You will be prompted to review the list and confirm whether you want to proceed with the updates.
How Yum Checks for Updates: Yum contacts the configured repositories and compares installed package versions with available updates.
Reviewing the List of Available Updates: Carefully check the list for any crucial updates or potential issues.
Confirming the Updates: To confirm the updates, simply type ‘y’ and press Enter. Yum will then download and install the updates for the selected packages.
Step 4: Perform the Update
With your confirmation, Yum will proceed to download and install the updates. This can take some time depending on the number of updates and your internet speed.
Downloading and Installing Updates: Yum handles this process automatically, fetching the updates from the repositories and applying them to your system.
Monitoring the Update Process: Keep an eye on the terminal for any prompts or errors that might require your attention.
Step 5: Verify the Updates
After the updates are installed, it’s important to verify that everything went smoothly.
Checking the Updated Packages: Use the command yum list updates to see the installed updates.
Ensuring System Stability Post-Update: Restart your services or even the entire server to ensure that the updates are correctly applied and your server is stable.
Step 6: Clean Up
Once the update is complete, cleaning up your system can free up space and remove unnecessary files.
Removing Unnecessary Files: Run yum clean all to remove cached package files and metadata.
Handling Common Issues
Sometimes updates don’t go as planned. Here’s how to handle common problems.
Troubleshooting Update Errors: Check Yum’s error messages and logs for clues. Common issues include network problems and repository issues.
Resolving Dependency Conflicts: Yum usually handles dependencies well, but if conflicts arise, you may need to resolve them manually by installing specific package versions or removing conflicting packages.
Security Considerations
Updating your server regularly is a key part of maintaining its security.
Importance of Regular Updates: New vulnerabilities are discovered frequently, so keeping your system updated minimizes risk.
Configuring Automatic Updates: Consider setting up automatic updates to ensure your server is always protected. This can be done by installing and configuring the yum-cron package.
Optimizing Your VPS Server Post-Update
Post-update is a great time to optimize your server.
Performance Tuning: Check your server’s performance and make necessary adjustments to improve speed and efficiency.
Ensuring Optimal Configuration: Review and adjust your configurations to make sure they align with the latest updates.
Backup Before You Begin
Before you start any update process, always make a backup.
Importance of Backups: Backups are crucial as they allow you to restore your server to its previous state if something goes wrong.
How to Backup Your VPS Server:
Use tools like rsync or create snapshots of your VPS through your hosting provider’s control panel.
Rolling Back Updates
Sometimes updates can cause issues that weren’t apparent initially. Knowing how to roll back can save you.
When and How to Roll Back: Use Yum’s history function to undo recent updates if needed.
Using yum history for Rollback: Commands like yum history undo [ID] allow you to revert specific transactions.
Best Practices for Maintaining Your VPS Server
Keeping your server in top shape requires regular maintenance.
Regular Maintenance Tips: Schedule regular check-ups, update packages frequently, and monitor your server’s health.
Monitoring System Performance: Tools like Nagios or Munin can help you keep an eye on your server’s performance metrics.
Additional Resources
For further learning and troubleshooting, here are some resources.
Useful Commands and Tools: Learn about commands like yum update, yum list updates, and yum clean all.
Where to Find Help and Support: Forums, documentation, and community support sites like CentOS.org and Stack Overflow.
Conclusion
Updating CentOS on your VPS server is essential for ensuring security and performance. By following the steps outlined above, you can keep your server up-to-date and running smoothly. Regular maintenance and backups are key practices to adopt, providing peace of mind and stability.
FAQs
Why is it important to update CentOS on my VPS server?
Regular updates ensure your server is secure, stable, and performing optimally by patching vulnerabilities and providing the latest features.
What should I do if an update fails?
Check the error messages and logs for details, and consider reverting to a previous state using a backup or the yum history undo command.
Can I automate the update process?
Yes, you can configure automatic updates using the yum-cron package to ensure your server stays updated without manual intervention.
How often should I update my CentOS server?
Regularly, preferably weekly or as soon as updates are available, to ensure your server remains secure and up-to-date.
What are the risks of not updating my CentOS server?
Failing to update your server can expose it to security vulnerabilities, performance issues, and incompatibility with newer software.