
How to Change Hostname on Your CentOS Server
How to Change Hostname on Your CentOS Server
Introduction
Changing the hostname of your CentOS server is a fundamental task that every system administrator should be familiar with. Whether you are running a small Virtual Private Server (VPS) or managing a large-scale hosting environment, the hostname plays a crucial role in network management and server identification. In this guide, we’ll walk you through the process of changing the hostname on your CentOS server, ensuring a smooth transition without any hiccups.
Understanding Hostnames
What is a Hostname?
A hostname is a unique identifier assigned to a server within a network. It helps in identifying and differentiating one server from another. Think of it as a name given to a person; it simplifies communication and management within the network.
Why Change the Hostname?
There are several reasons you might want to change the hostname of your server. It could be for organizational purposes, such as renaming servers to match their roles or locations, or for branding purposes, especially in a hosting environment where clarity and consistency are key.
Preparing for the Change
Checking Current Hostname
Before making any changes, it’s essential to know the current hostname of your server. This will help you verify the changes later and ensure that the process was successful.
Tools Needed
The primary tool we will use for changing the hostname on CentOS is the hostnamectl command, which is a part of the systemd suite of tools. This command makes it easy to set and change the hostname in a straightforward manner.
Step-by-Step Guide to Changing Hostname on CentOS
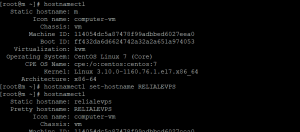
Step 1: Check the Current Hostname
Before changing the hostname, it’s a good idea to check the current hostname. You can do this by running the following command:
Hostnamectl
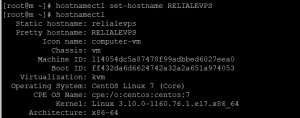
Step 2: Change the Hostname
To change the hostname, use the following command:
hostnamectl set-hostname RELIABLEVPS
This command sets the new hostname to “RELIABLEVPS”. Make sure to replace “RELIABLEVPS” with the desired hostname for your server.
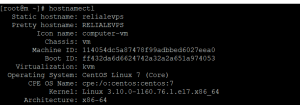
Step 3: Verify the Changes
To verify that the hostname has been changed successfully, run the hostnamectl command again:
Hostnamectl
Detailed Steps and Commands
Using hostnamectl
The hostnamectl command is a versatile tool that simplifies the process of managing hostnames on a CentOS server. By using this command, you can set the static, pretty, and transient hostnames all at once.
Alternative Methods
While hostnamectl is the recommended method, you can also change the hostname by directly editing configuration files like /etc/hostname and /etc/hosts. However, this approach is less user-friendly and prone to errors, making hostnamectl the preferred choice for most users.
Common Issues and Troubleshooting
Hostname Not Updating
If the hostname does not update immediately, try restarting the systemd-hostnamed service:
systemctl restart systemd-hostnamed
This should resolve most issues related to hostname changes.
Network Issues Post-Change
After changing the hostname, ensure that all network configurations and DNS records are updated accordingly. Failure to do so can lead to network connectivity issues.
Best Practices for Hostname Changes
Naming Conventions
When choosing a hostname, follow a consistent naming convention. This helps in managing and identifying servers easily, especially in large hosting environments. Use descriptive names that reflect the server’s role or location.
Documentation
Document all changes made to the server, including hostname changes. This is crucial for maintaining a clear record of modifications and for troubleshooting any future issues.
Integrating Hostname Changes with Server Management
Updating DNS Records
After changing the hostname, update the corresponding DNS records to reflect the new name. This ensures that the server can be reached using its new hostname.
Synchronizing with Other Services
Ensure that all services and applications running on the server recognize the new hostname. This might involve updating configuration files and restarting services.
Security Implications of Changing Hostnames
Changing the hostname can have security implications. For instance, some security certificates and configurations are tied to the hostname. Ensure that these are updated to prevent security vulnerabilities.
Conclusion
Changing the hostname on your CentOS server is a straightforward process when using the hostnamectl command. By following the steps outlined in this guide, you can ensure that your server’s hostname is updated correctly and efficiently. Remember to verify the changes, update relevant configurations, and maintain proper documentation.
FAQs
Q1: What is the purpose of a hostname on a CentOS server?
A hostname serves as a unique identifier for a server within a network, helping in its identification and management.
Q2: Can I change the hostname without rebooting the server?
Yes, using the hostnamectl command allows you to change the hostname without needing to reboot the server.
Q3: What should I do if the hostname change does not take effect immediately?
Try restarting the systemd-hostnamed service using systemctl restart systemd-hostnamed.
Q4: Are there any security concerns with changing the hostname?
Yes, some security configurations and certificates may be tied to the hostname. Ensure these are updated to maintain security.
Q5: How do I ensure all network configurations recognize the new hostname?
Update DNS records and any service configurations that rely on the hostname to ensure proper network functionality.