
How to install Apache on CentOS
How to Install Apache on CentOS VPS Server
Introduction
Installing Apache on a CentOS VPS server is a straightforward process that ensures your server is ready to host your websites or web applications. This guide provides a step-by-step approach to get Apache up and running on your CentOS system efficiently.
Prerequisites
Before we dive into the installation process, there are a few prerequisites to ensure a smooth setup:
- A CentOS VPS server.
- Root or sudo access to the server.
- A stable internet connection.
Step 1: Update Package Index
To kick things off, you need to update the package index on your CentOS system. This step ensures you get the latest versions of packages.
sudo yum update

Why Updating is Important
Updating the package index is crucial as it refreshes the list of available packages and their versions. This helps avoid potential conflicts and ensures that you install the latest and most secure versions of the packages.
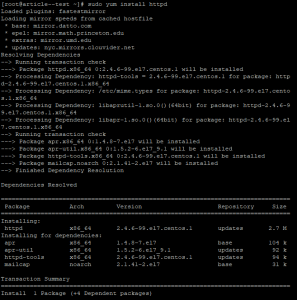
Step 2: Install Apache
Once your package index is updated, the next step is to install Apache using the yum package manager.
sudo yum install httpd
Understanding Apache and its Role
Apache is a powerful and widely-used web server software that handles HTTP requests. It serves web pages to users and is essential for hosting websites and applications.
Step 3: Start Apache
After installing Apache, you need to start the Apache service.
sudo systemctl start httpd
![]()
- Enable Apache to Start on Boot: To ensure Apache starts automatically when your system boots up, enable it.
sudo systemctl enable httpd
![]()
Checking the Service Status
Starting the Apache service activates the web server. You can check if Apache is running properly by looking at its status.
Step 4: Enable Apache to Start on Boot
To ensure that Apache starts automatically when your system boots up, you need to enable it.
sudo systemctl status httpd
Benefits of Enabling Apache on Boot
Enabling Apache to start on boot ensures that your web server is always running after a system reboot, providing continuous availability of your hosted websites.
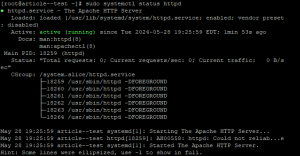
Step 5: Check Apache Status
Finally, verify that Apache is running properly by checking its status.
sudo systemctl status httpd
Verifying Apache Installation
Checking the status of Apache helps confirm that the installation was successful and that the service is active and running as expected.
Conclusion
Congratulations! You have successfully installed Apache on your CentOS VPS server. By following these steps, you’ve ensured that your server is ready to host your websites or web applications. With Apache up and running, you can now start configuring it to meet your specific needs.
FAQs
What is Apache?
Apache is an open-source web server software that is widely used to serve web content. It supports various features, including SSL/TLS, virtual hosting, and URL redirection.
Why use CentOS for Apache?
CentOS is a robust, enterprise-grade operating system that is ideal for hosting web servers like Apache due to its stability, security, and long-term support.
How to troubleshoot Apache installation issues?
If you encounter issues during the installation, check the error logs located in /var/log/httpd/. Common problems can often be resolved by ensuring all dependencies are installed and that there are no conflicts with existing services.
What are some common Apache commands?
- sudo systemctl start httpd: Starts the Apache service.
- sudo systemctl stop httpd: Stops the Apache service.
- sudo systemctl restart httpd: Restarts the Apache service.
- sudo systemctl status httpd: Checks the status of the Apache service.
How to secure Apache on CentOS?
To secure Apache, consider implementing the following:
- Enable and configure a firewall (using firewalld or iptables).
- Install and configure a SSL/TLS certificate for HTTPS.
- Regularly update Apache and its modules.
- Use security modules like mod_security to enhance protection.