
How To install Rocky Linux
How to Install Rocky Linux: A Comprehensive Guide
Rocky Linux, a community-driven enterprise operating system, has gained popularity for its reliability and stability. Whether you’re setting up a server or desktop environment, installing Rocky Linux is a straightforward process. In this guide, we’ll walk you through the step-by-step installation procedure, ensuring a smooth transition to this robust Linux distribution.
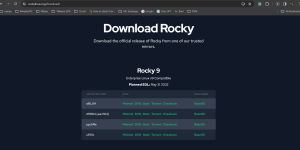
Step 1: Download the Rocky Linux ISO
Before diving into the installation process, you need to acquire the Rocky Linux ISO file. Visit the official Rocky Linux website at rockylinux.org/download/ and navigate to the download section. Here, you can choose the appropriate version of Rocky Linux tailored to your system’s hardware architecture and intended use, whether it’s for a server or desktop environment.
Step 2: Create Bootable Media
Once you’ve downloaded the Rocky Linux ISO, the next step involves transferring it onto a bootable medium, such as a USB flash drive or a DVD. Tools like Rufus (for Windows) or Etcher (for Linux and macOS) simplify this process, allowing you to create a bootable USB drive effortlessly.
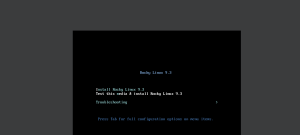
Step 3: Boot from the Installation Media
With the bootable media ready, insert it into your computer and restart the system. Access your BIOS or UEFI settings to ensure that your computer boots from the inserted media. Upon restart, select the option to boot from the installation media when prompted.
Step 4: Start the Installation
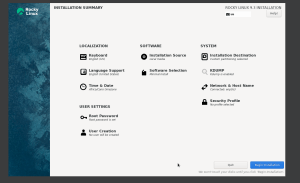
Upon successful booting from the installation media, you’ll encounter the Rocky Linux installation screen. Follow the on-screen instructions to kickstart the installation process seamlessly.
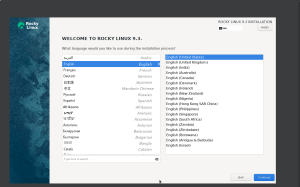
Step 5: Choose Installation Options
Navigate through the installation wizard to specify your preferences, including language, time zone, keyboard layout, disk partitioning, and software packages. Customize these settings according to your specific requirements to tailor your Rocky Linux environment to your liking.
choose language:
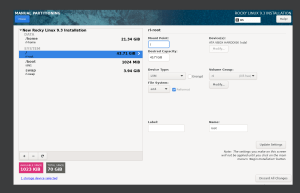
Set disk partitioning
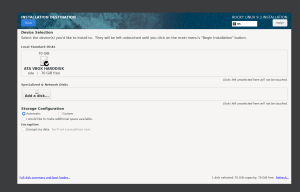
If you need to customize your partitioning
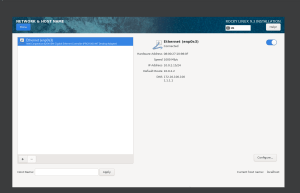
Network configuration
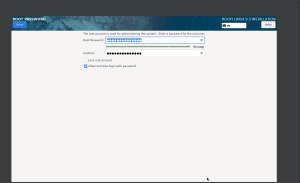
Step 6: Set Root Password and Create User
As part of the installation process, you’ll be prompted to set a secure password for the root account. It’s crucial to choose a strong password to enhance the security of your system. Additionally, consider creating a regular user account for everyday use, following best practices in user management.
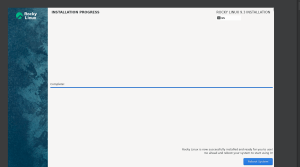
Step 7: Complete the Installation
Proceed with the installation process after configuring all necessary settings. The installer will copy essential files to your hard drive and configure the system accordingly.
Step 8: Reboot
Once the installation is complete, the system will prompt you to reboot. Remove the installation media from your computer and allow the system to boot into your freshly installed Rocky Linux environment.
Step 9: Post-Installation Configuration
After rebooting, you may need to perform additional configuration tasks, such as installing updates, configuring network settings, and installing additional software. Customize your system further by configuring firewall settings, setting up SSH, and tweaking system preferences to meet your specific needs.
Installing Rocky Linux is a straightforward process that ensures a stable and reliable operating environment for both server and desktop users. By following these steps diligently, you can set up your system with ease, harnessing the power of Rocky Linux for your computing needs.
Conclusion
In conclusion, installing Rocky Linux is a seamless process that offers users a robust and dependable operating system. Whether you’re a seasoned Linux user or new to the world of open-source software, Rocky Linux provides a stable foundation for your computing endeavors.
FAQs (Frequently Asked Questions)
-
Is Rocky Linux suitable for server environments?
- Yes, Rocky Linux is well-suited for server environments, offering stability, security, and long-term support.
-
Can I install Rocky Linux alongside other operating systems?
- Absolutely, Rocky Linux supports dual-boot configurations, allowing you to run it alongside other operating systems on the same machine.
-
Does Rocky Linux receive regular updates and security patches?
- Yes, the Rocky Linux community ensures timely updates and security patches to keep your system secure and up to date.
-
Is Rocky Linux free to use?
- Yes, Rocky Linux is free and open-source software, making it accessible to all users without any licensing fees.
-
Where can I find support and documentation for Rocky Linux?
- You can find comprehensive documentation and community support for Rocky Linux on the official website and various online forums dedicated to Linux enthusiasts.