
How to Install Nvidia Drivers on Ubuntu
How to Install Nvidia Drivers on Ubuntu
Introduction
Nvidia drivers play a crucial role in optimizing graphics performance on Ubuntu systems, particularly for tasks involving high graphical demands such as gaming or graphic design. This guide provides a comprehensive walkthrough for installing Nvidia drivers on Ubuntu, ensuring smooth and efficient performance.
Searching for Nvidia Driver
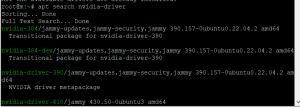
To begin the installation process, the first step is to search for available Nvidia drivers using the apt search command:
apt search nvidia-driver
Updating Package Lists
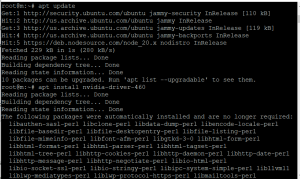
Before diving into the installation, it’s imperative to update the package lists to ensure access to the latest available versions:
sql
apt update
Installing Nvidia Driver
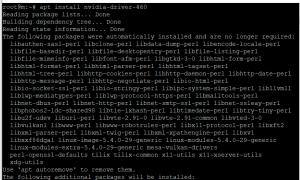
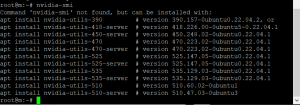
Once the package lists are updated, proceed with installing the Nvidia driver. Users have the flexibility to choose a specific version of the Nvidia driver for installation. For example, to install version 460, execute the following command:
apt install nvidia-driver-460
Rebooting the System
After successfully installing the Nvidia driver, it is essential to reboot the system to apply the changes effectively:
reboot
A system reboot ensures that the newly installed Nvidia driver is fully integrated and operational, optimizing graphics performance on the Ubuntu system.
Verifying Installation
Following the system reboot, it’s prudent to verify whether the Nvidia driver has been installed correctly and is functioning as intended. This can be done using the nvidia-smi command:
nvidia-smi
Conclusion
In conclusion, installing Nvidia drivers on Ubuntu is a crucial step in optimizing graphics performance and ensuring smooth operation, particularly for tasks involving high graphical demands. By following the steps outlined in this guide, users can successfully install Nvidia drivers on their Ubuntu systems, enhancing overall performance and user experience.
FAQs
What are Nvidia drivers, and why are they important on Ubuntu?
Nvidia drivers are software components that facilitate communication between the Nvidia GPU and the operating system, enabling optimized graphics performance. They are essential on Ubuntu for tasks such as gaming, graphic design, and video editing.
How do I choose the right version of the Nvidia driver for my system?
The choice of Nvidia driver version depends on factors such as the specific Nvidia GPU model and compatibility with the Ubuntu system. It’s advisable to research compatibility and consult official documentation or forums for guidance.
What should I do if I encounter errors during the installation process?
If errors occur during the installation of Nvidia drivers on Ubuntu, troubleshooting steps such as checking system requirements, updating packages, or consulting online resources for solutions may be necessary.
Is it necessary to reboot the system after installing Nvidia drivers?
Yes, rebooting the system is essential to apply the changes and ensure that the newly installed Nvidia drivers are fully integrated and operational.
How can I ensure that the Nvidia driver is functioning correctly after installation?
To verify the correct installation and functionality of Nvidia drivers on Ubuntu, users can use the nvidia-smi command to check for GPU information, confirming that the drivers are loaded correctly.