
how to make a bootable ubuntu usb
How to Make a Bootable Ubuntu USB
Introduction
Creating a bootable Ubuntu USB is an essential skill for anyone looking to install or troubleshoot Ubuntu on their computer. In this guide, we’ll walk you through the process step by step, ensuring that even beginners can successfully create their bootable Ubuntu USB.
Downloading the Ubuntu ISO
The first step in creating a bootable Ubuntu USB is to download the Ubuntu ISO file from the official website. Head over to releases.ubuntu.com/focal/ to download the ISO file. This file contains the entire Ubuntu operating system and will serve as the foundation for your bootable USB.
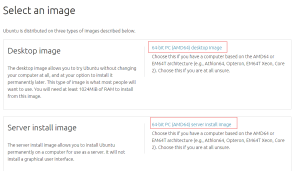
Choosing the Target Image
Once you’ve downloaded the Ubuntu ISO, you’ll need to choose the target image for your USB. This is the USB stick that you’ll be writing the Ubuntu ISO to. Make sure you have a USB stick with enough storage space to accommodate the Ubuntu installation.
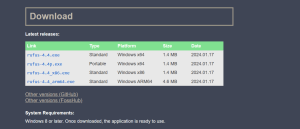
Downloading Rufus
Next, you’ll need to download Rufus, a free and open-source USB stick writing tool. Rufus is available for download from rufus.ie/en/. This tool will facilitate the process of writing the Ubuntu ISO to your USB stick.
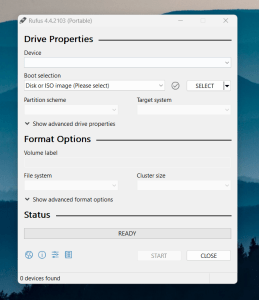
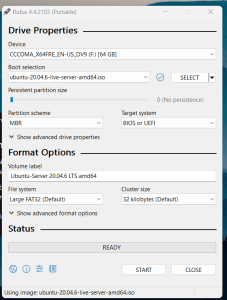
Launching Rufus
After downloading Rufus, launch the application on your computer. Rufus has a simple and user-friendly interface, making it accessible to users of all experience levels.
Inserting the USB Stick
Insert the USB stick that you selected as the target image into an available USB port on your computer. Make sure the USB stick is properly inserted and recognized by your system.
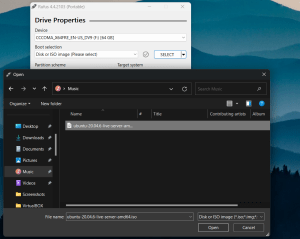
Selecting the Ubuntu ISO File
In Rufus, select the Ubuntu ISO file that you downloaded earlier. This will be the file that Rufus writes to your USB stick to make it bootable.
Starting the Writing Process
With the Ubuntu ISO file selected, click on the “START” button in Rufus to begin the writing process. Before proceeding, Rufus will prompt you with a warning that all data on your selected USB device will be destroyed. Ensure that you’ve selected the correct drive before proceeding.
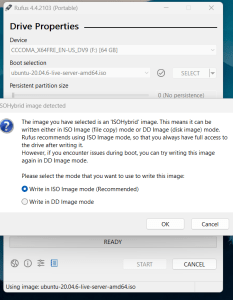
Using ISO Image Mode
For optimal results, it’s recommended to write the ISO to the USB stick in ISO image mode. This mode ensures that the entire Ubuntu ISO is written to the USB stick, preserving its bootable properties.
Warning About Data Loss
As mentioned earlier, Rufus will warn you about the potential loss of data on your USB device before proceeding with the writing process. Double-check that you’ve selected the correct USB drive to avoid any accidental data loss.

Writing the ISO to the USB Stick
Once you’ve confirmed the settings in Rufus and acknowledged the warning about data loss, Rufus will begin writing the Ubuntu ISO to your USB stick. This process may take some time depending on the speed of your USB port and the size of the ISO file.
Conclusion
Congratulations! You’ve successfully created a bootable Ubuntu USB using Rufus. With this USB stick, you can now install or troubleshoot Ubuntu on any compatible computer with ease.
FAQs
Can I use any USB stick to create a bootable Ubuntu USB?
- While technically you can use any USB stick, it’s recommended to use a high-quality USB stick with enough storage space to accommodate the Ubuntu ISO.
-
Can I use the same USB stick for other purposes after creating a bootable Ubuntu USB?
- Yes, you can reformat the USB stick after creating a bootable Ubuntu USB and use it for other purposes.
-
Do I need an internet connection to create a bootable Ubuntu USB?
- No, you only need an internet connection to download the Ubuntu ISO file. Once downloaded, you can create the bootable USB offline.
-
Can I create a bootable Ubuntu USB on a Mac computer?
- Yes, Rufus is available for Windows, but there are alternative methods for creating a bootable Ubuntu USB on a Mac.